|

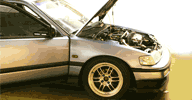
Honda CRX Nitrous Install
12/2/2005
| |
 |
 Let's face it, not everyone has thousands of dollars to invest in making their car fast. If it was a perfect world, everyone
would have an unlimited supply of resources and money to do whatever they wanted without a problem. For the normal people
of the world, we have to make things work with what we've got and for the normal people of the world, nitrous is the easy
solution to making your car go faster. For today's installation, we're going to be giving this Honda CRX a little help in
the “go-fast” or “go-a-little-faster” department by installing a Nitrous Works, nitrous system. Let's face it, not everyone has thousands of dollars to invest in making their car fast. If it was a perfect world, everyone
would have an unlimited supply of resources and money to do whatever they wanted without a problem. For the normal people
of the world, we have to make things work with what we've got and for the normal people of the world, nitrous is the easy
solution to making your car go faster. For today's installation, we're going to be giving this Honda CRX a little help in
the “go-fast” or “go-a-little-faster” department by installing a Nitrous Works, nitrous system.
|
|
As you can see here, the Nitrous Works kit comes complete with everything you
need; solenoids, jets, stainless steel line, switches, a 10lb. bottle, bottle brackets and all of the remaining hardware.
We went ahead disconnected the positive battery terminal and also separated all of the hardware before we began the installation
to make sorting through all of the parts a lot easier. |
|
First we had to find a place to mount the supplied bottle; obviously the location
will vary between cars, but in the CRX we mounted it on the driver's side, right outside the spare tire opening. Line up the
bottle brackets and use a marker to mark the holes where you'll be drilling. Once you've got that done, go ahead and make
the openings and install the brackets, making sure the taller one is towards the front of the car so the bottle can lean back.
As soon as you've got the brackets and bottle in place, connect the stainless line to the bottle and feed it through the cabin
and firewall into the engine compartment. Using tie straps, secure the line throughout the cabin making sure to keep out of
harms way. |
Next it's time to mount the solenoids and nitrous spray nozzle. First, look
around the engine bay for a place to mount the solenoids, remembering to stay away from exhaust components. We opted for a
nice, roomy spot on the firewall to the right of the fuse box which would give us ample room for the lines. Once the solenoids
are mounted, move on to find a spot for the nitrous spray nozzle. On the intake we used, we found a spot right around the
first bend, drilled our opening and then inserted the supplied fitting using Teflon paste. Using the information on the supplied
chart, use the appropriate jets to give you the “shot” of nitrous you'd like to use.
|
With the spray nozzle fitting in place, attach the spray nozzle and tighten
it in place. Grab the two stainless lines and attach them to their respected places (the red will be your fuel line, while
the blue is your nitrous line) and then attach the nitrous line run from inside the car to the opening on the back of the
nitrous solenoid. You'll also need to attach the short fuel line to the rear of the fuel solenoid, remembering to leave the
other end disconnected for now.
|
Moving on to the electrical part; you'll find two wires coming from the back
of each solenoid (either one can be negative or positive.) Pair the two sets together, using one wire from each solenoid,
one pair will be your ground and the other will be your power. Find somewhere solid near the firewall and ground down the
first pair. For the second pair, splice them together and run the extended wiring into the cabin. Since we're using a momentary
switch, we first ran the wiring to the switch we mounted on the center console. From the momentary switch, run the wiring
to the power switch, we chose to mount ours on the dash board. Finally, run the wiring to the power source, in this case we
used the vehicles fuse block, under the driver's side of the dash. With all of the wiring complete, all that's left is running
the fuel line. The remaining line from the solenoids should be run to the fuel filter and then tightened.
|
| Now that everything is on place, go ahead and double check your work. Tighten the ends of the lines,
double check your wiring and finally reconnect your positive battery terminal. To check for fuel leaks, start your car and
look over all of the lines and fittings. If you feel you're not capable of doing the installation we recommend taking it to
a professional. |
Sources:
Barry Grant Inc. (Nitrous Works)
1450 McDonald Road
Dahlonega, GA 30533
www.barrygrant.com
DM Motorsports
Kevin Berdrow
(909)374-9945
| | |
|
 |
|

